Starting point is that you have an account on ADFS with sufficient permissions.
- Open the AD FS Management console (Server Manager → Tools → AD FS Management)
- Right-click Application Groups and select Add Application Group; alternatively, select Application Groups and select Add Application Group from the list of available actions under the Action menu bar or the Actions pane
- Enter a Name and optionally a Description for the new application group
- In the Template list, under Client-Server applications, select the Server application accessing a web API type. Click Next
- Make note of the Client Identifier. This ID will be needed in a later step as well as in sending it to Viadesk.
- Enter the four Viadesk Redirect URIs, they usually have this form:
https://mydomain.viadesk.com
https://mydomain.viadesk.com/do/sharepointtoken
https://mydomain.viadesk.com/do/office365token
https://mydomain.viadesk.com/do/openidauthenticate
And click Next.
7. Check the option to Generate a shared secret, copy the value to the clipboard, and save it in a secure place. This will be needed in the Viadesk configuration. Click Next
8. Add an Identifier value that is equal to the Client Identifier generated above. Click Next
9. Under Choose an access control policy, select Permit everyone. Click Next
10. On the Configure Application Permissions page, under Permitted scopes, make sure openid and allatclaims are checked. Click Next
11. Review the summary and click Next to create the Application Group
12. Click Close to complete the wizard
13. We need the Authorize and Token url, they usually have this form:
https://your.website.com/adfs/oauth2/authorize
https://your.website.com/adfs/oauth2/token
Send the Authorize and Token Url, together with the Client Identifier and secret to Viadesk. See next page if you would like to create user in Viadesk, if they don’t exist yet.
Now we continue with setting the right claims to create a User in Viadesk:
14. In AD FS Management, click on Application Groups to get list of all application groups. Right-click on ADFSSSO and select Properties. Select ADFSSSO - Web API and click Edit...
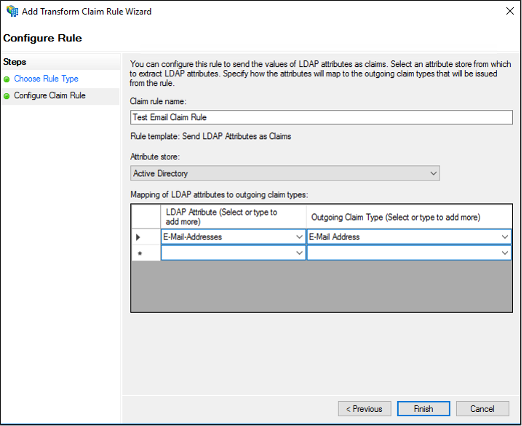
15. On ADFSSSO - Web API Properties screen, select Issuance Transform Rules tab and click Add Rule..
16. On Add Transform Claim Rule Wizard screen, select Send LDAP Attributes as Claims from the drop-down and click Next
17. On the Configure Rule page under Claim rule name type the display name for this rule, select the Attribute Store, and then select the LDAP attribute and map it to the outgoing claim type. Attributes like given_name, middle_name, family_name, birthday and locale can be read by Viadesk.